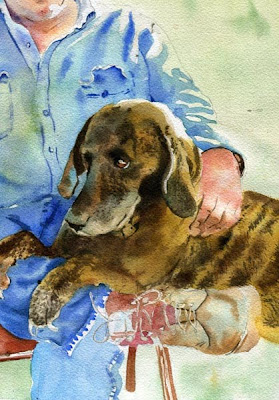
The painting starts with a blank piece of paper with a pencil drawing. I first add masking fluid to the parts that I want to keep white until the very end, such as eye sparkles. The only areas I masked on this painting were the dog's eye sparkle, his claws, and the shoe laces. This makes it easier to paint around those areas and not worry about saving the white of the paper. I then lay in the first wash by wetting the section I want to work on. In this painting I did a few sections; his face, the dog, the background, the clothes, and his boots. For his face, I wet all the areas except those where the sun hit him. Then I dropped in various colors - warm in the sun lit areas and cooler colors in the shaded areas. The second section was the background. Again, I kept the hat and face dry, and moistened the rest of the paper, then dropped in yellows and greens. For the first layers of most paintings, I work wet in wet, which keeps everything soft.

You can see at this stage I also did his shirt and pants as one large area for the first wash. I got the whole thing wet except for where the sun hits it, then dropped in different colors of blue, green and yellow. It's good to use more than one color in these first washes as they add interest and keep the painting from looking flat.

In the picture below I added more detail to the dog. I got the whole dog wet, then, with thicker but moist paint, added some of his stripes on his body and markings on his face.

Below I added the pocket details. Working with a less wet paper, but still moist to keep things soft, I used a little bit thicker paint for the lines of the seams. To get the right moisture on the paper, I use a nice sable brush and squeeze out the water so it's not dripping, but still has plenty of water in it. I run this over the areas I want to add soft details.

Although the picture below was after the picture above, you'll notice the dog's muzzle is lighter. I use Mr. Clean Magic Eraser pads, the ones you find in the grocery store cleaning aisle, to 'erase' some of the paint. They don't have any harmful chemicals in them and are perfectly safe for painting.

Here I've added the first wash to the boot. I try to do the 'first wash' and maybe the 'first soft detail' step on each section before I progress to the final stage of the painting to put in the fine details, which I often do mostly on dry paper. Stay tuned for the final stages of this painting!
 To see some painting tutorials, click here. Click on uploads and you'll be able to scroll down to see the tutorials. I have over 20 posted.
Wow, this is coming out wonderful, Rachel. I'll check out your tutorials when I have sometime. Thanks.
ReplyDeleteDo you let the paper dry between washes? I'm assuming you do or you'd have colors bleeding together and back-washes everywhere. Do you let it dry naturally or do you help it along with a hairdryer. Thanks for sharing your step by step process. It's very effective.
ReplyDeleteWhat an awesome tutorial and painting! I'm so glad I found you (via Flickr) - you are quite an inspiration!!!!!! I really LOVE your work!
ReplyDeleteThanks Carol and Linda!
ReplyDeleteJoyfulartist - I do let the paper dry in between washes. If you try to paint on paper that is half dry, the wash you just laid down will get blossoms. Sometimes I use a hair dryer, but more often I just set that painting aside and work on another one. I'm usually working on several paintings at one time!
Thanks for showing the work in progress, it is so helpful when you are starting out to see how the paintings progress, your work is simply amazing.
ReplyDeleteRachel... you are a miracle worker with watercolors... what talent! Thank you for sharing... I had to laugh about the Mr. Clean erasers... glad to find a use for them. I used one on my cabinet doors and they sanded the finish right off! :( I'll move them from cleaning supplies to art supplies! Loved that tip! I'll be returning to your impressive blog for more help as I start my art career! Clair DeLune, Blues Moon Radio
ReplyDeleteMaria and Clair -
ReplyDeleteIt is a joy to share what I've learned with others!
Rachel, I just wanted to thank you again. The Water Color of my husband and Brittany brought tears to my eyes. My husband will be so surprised as we lost our Brittany in May, she was 13, and a very big part of our family.
ReplyDeleteGod Bless, Bonnie
Bonnie - I'm so sorry to hear about Brittany and I hope this painting will help keep those wonderful memories fresh and alive!
ReplyDelete