Thursday, June 30, 2011
Thank you for your donations!
Thank you to all who donated this year to my kids fund. I am a school social worker, and the needs are always overwhelming, but your donations have helped. Things I used the money for include glasses, shoes, field trip money, graduation items, emergency food, and gas for medical appointments. If you would like to donate, there is a "donate" button on this blog in the top right corner. Thank you so much!!!!


Wednesday, June 29, 2011
Painting of a Gelada Baboon from Ethiopia
Aaaaaaaaaah, I love summer - I have time to finish paintings! This is of a Gelada Baboon from Ethiopia. Thank you to Giovanni Mari for the reference photo!


Monday, June 13, 2011
Finished another commission...
Just finished this one - I'm sorry I haven't been around for a while! I've been working on getting my private practice license for social work - my 'other' job. Hopefully this summer I'll be painting a lot more. I have several commissions I have to finish and then I'll be working on some things that I enjoy painting. 

Saturday, April 02, 2011
New Commissions finished!!
I've been getting TONS of commissions, and now my waiting list extends into the summer, so it's been crazy! Here are a few I finished recently...


Monday, January 17, 2011
New Foxhunting Art - an original watercolor
This is a painting I just finished that will be part of my Camden, SC show February 12, 12-6 PM at The Garden Gate Gallery. Camden, along with Aiken, is horse country in South Carolina. I'd love to see you there!


"16 x 20"
I haven't come up with a name yet, so all you foxhunting enthusiasts help me out!
Thursday, January 13, 2011
Finished Gina's winning painting!
I finished painting part of Gina's winning photo, now I just have to finish her Maine Coon!
 Gina's Siamese
10" x 8"
Here's the original photo...

 Gina's Siamese
10" x 8"
Here's the original photo...

Wednesday, January 12, 2011
My version of the bubble ball light...

Thanks to a great idea I found on the blog Small Notebook - I decided to venture forth on creating my own bubble ball light!


Sunday, January 02, 2011
Art Show...
 Tonight, Pocket Productions did their Digital Graffiti show - they projected local artists' work on an icon of Columbia, SC; the Adluh Flower building. They'll be projecting on Thursday January 7 at 7 PM above S & S Art Supply, so come join the fun if you're in town! These pictures show a couple of my images that they presented.
Wednesday, December 29, 2010
A couple things I'm working on today...
Did you think I forgot? I didn't! I'm FINALLY starting the winner of the last poll. I've actually taken one picture and turned it into two - I thought both cats were so beautiful they deserved some individual attention. Here's what I've gotten done today...
 Click on the pictures to see larger versions

 Click on the pictures to see larger versions
Tuesday, December 28, 2010
Giraffe Art
I've been itching to do a large version of this giraffe ever since I did a mini study, and I've finally finished it. This giraffe lives in Nairobi at Giraffe Manor. I'd love to visit some day!
 "Giraffe and Sky"
20" x 13"

 "Giraffe and Sky"
20" x 13"

Suffolk Punch Art and more
I'm lovin' my winter break - getting a ton of commissions done, including these...

 I didn't get this one's jaw wrong - it is crooked from being shot, poor thing!
 These are Suffolk Punch draft horses.
 I didn't get this one's jaw wrong - it is crooked from being shot, poor thing!
 These are Suffolk Punch draft horses.
Thursday, December 23, 2010
Tuxedo and Friend Watercolor Painting
I'm finally finding time to complete some paintings, now that I'm off for Christmas break. I'm hoping to get several commissions finished and a couple I've been doing for fun before I go back to work. Here's the latest...

Thank you to Geonetix for his wonderful photography!
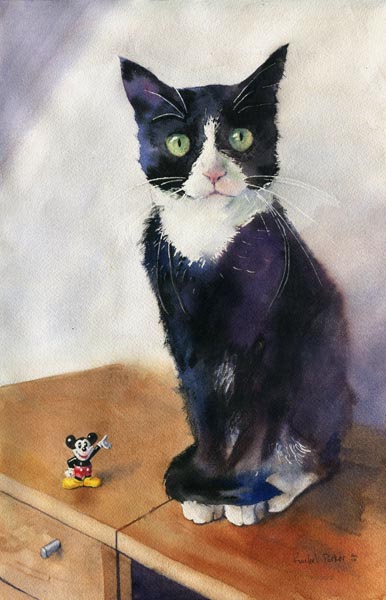

Thank you to Geonetix for his wonderful photography!
Saturday, December 18, 2010
Come Cruise with me!
In December, 2011, I'll be cruising and teaching watercolor. I'd love for you to come join me! I'll be teaching beginning watercolor the Dec 23 sailing of Royal Caribbean's Voyager of the Seas. We'll be exploring Cozumel, Grand Caymen, and Falmouth, Jamaica. They have me scheduled to teach three sessions, but if I get additional students I may do some additional plein aire sessions at the different ports.
Monday, November 15, 2010
Christmas Shoes!
I had someone special order these shoes from me...
 Cute aye? I made them with my painting "First Snow".
 Cute aye? I made them with my painting "First Snow".
Friday, November 12, 2010
Great book for dog lovers!
My cat and dog art will be featured in this book...


I even made the front cover with "Hunt Horse Hounds" : )
It's available on Amazon, where you can look through many of the pages and read tons of cute quotes about dogs.
It's available on Amazon, where you can look through many of the pages and read tons of cute quotes about dogs.
Thursday, November 11, 2010
Commission Done!
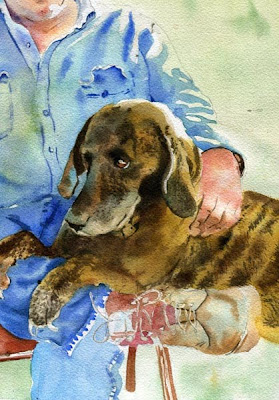
 For the final phase of the painting, I took a light wash of blue paint and washed it over the entire lower third of the painting to tie his jeans to the background grass and to soften this areas as it's not the center of interest. I also darkened the grass under the subject to anchor the painting and give it more depth.
Sunday, November 07, 2010
"Myrtle Beach Tees" watercolor painting
When I lived near Myrtle Beach I used to love to go take pictures of the night life. I worked on this little painting for four years. Sometimes paintings are like good wine, they need to sit. This painting has a lot of thought put into it. I was trying to capture that neon glow that is the essence of Myrtle Beach night life!


Saturday, November 06, 2010
New Watercolor Painting - Tortoise Shell Cat

I just finished this one; it's from a picture I took over the summer while doing a show in Pine Mountain, Georgia. Thanks Babs, for letting me visit your gorgeous farm! Both the original and prints are available.

Sunday, October 31, 2010
Work in Progress - Bonnie's Commission
I thought it would be fun to do a 'works in progress' for those of you who paint so you can see my progression through the painting process. Below is a picture of "Don". His wife is giving this to him for Christmas.
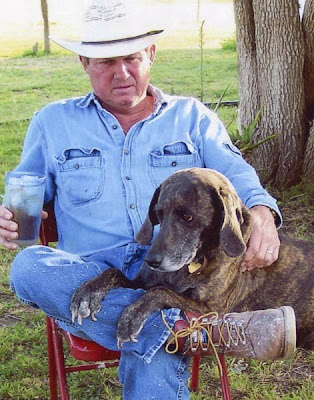
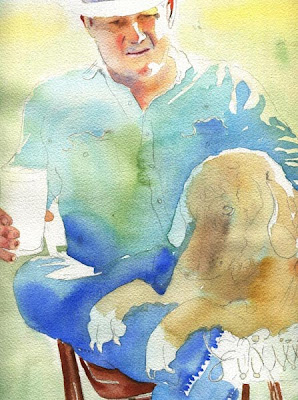
The painting starts with a blank piece of paper with a pencil drawing. I first add masking fluid to the parts that I want to keep white until the very end, such as eye sparkles. The only areas I masked on this painting were the dog's eye sparkle, his claws, and the shoe laces. This makes it easier to paint around those areas and not worry about saving the white of the paper. I then lay in the first wash by wetting the section I want to work on. In this painting I did a few sections; his face, the dog, the background, the clothes, and his boots. For his face, I wet all the areas except those where the sun hit him. Then I dropped in various colors - warm in the sun lit areas and cooler colors in the shaded areas. The second section was the background. Again, I kept the hat and face dry, and moistened the rest of the paper, then dropped in yellows and greens. For the first layers of most paintings, I work wet in wet, which keeps everything soft.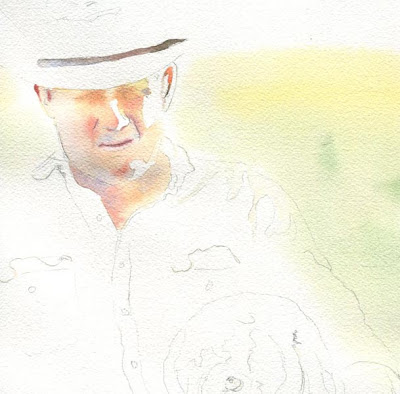
You can see at this stage I also did his shirt and pants as one large area for the first wash. I got the whole thing wet except for where the sun hits it, then dropped in different colors of blue, green and yellow. It's good to use more than one color in these first washes as they add interest and keep the painting from looking flat.
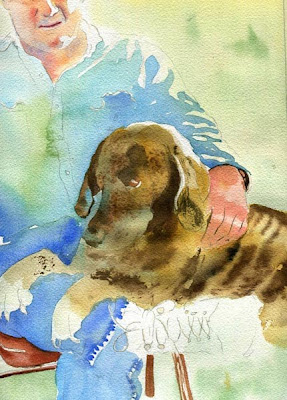
In the picture below I added more detail to the dog. I got the whole dog wet, then, with thicker but moist paint, added some of his stripes on his body and markings on his face.
Below I added the pocket details. Working with a less wet paper, but still moist to keep things soft, I used a little bit thicker paint for the lines of the seams. To get the right moisture on the paper, I use a nice sable brush and squeeze out the water so it's not dripping, but still has plenty of water in it. I run this over the areas I want to add soft details.
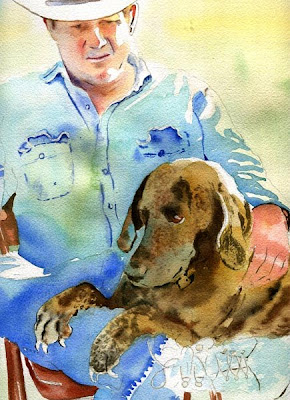
Although the picture below was after the picture above, you'll notice the dog's muzzle is lighter. I use Mr. Clean Magic Eraser pads, the ones you find in the grocery store cleaning aisle, to 'erase' some of the paint. They don't have any harmful chemicals in them and are perfectly safe for painting.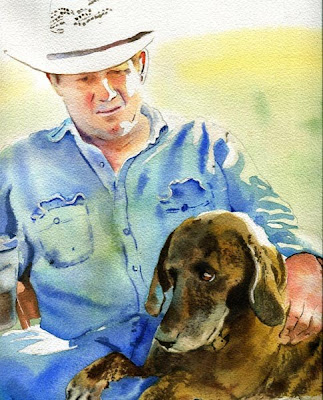
Here I've added the first wash to the boot. I try to do the 'first wash' and maybe the 'first soft detail' step on each section before I progress to the final stage of the painting to put in the fine details, which I often do mostly on dry paper. Stay tuned for the final stages of this painting!
 To see some painting tutorials, click here. Click on uploads and you'll be able to scroll down to see the tutorials. I have over 20 posted.

The painting starts with a blank piece of paper with a pencil drawing. I first add masking fluid to the parts that I want to keep white until the very end, such as eye sparkles. The only areas I masked on this painting were the dog's eye sparkle, his claws, and the shoe laces. This makes it easier to paint around those areas and not worry about saving the white of the paper. I then lay in the first wash by wetting the section I want to work on. In this painting I did a few sections; his face, the dog, the background, the clothes, and his boots. For his face, I wet all the areas except those where the sun hit him. Then I dropped in various colors - warm in the sun lit areas and cooler colors in the shaded areas. The second section was the background. Again, I kept the hat and face dry, and moistened the rest of the paper, then dropped in yellows and greens. For the first layers of most paintings, I work wet in wet, which keeps everything soft.

You can see at this stage I also did his shirt and pants as one large area for the first wash. I got the whole thing wet except for where the sun hits it, then dropped in different colors of blue, green and yellow. It's good to use more than one color in these first washes as they add interest and keep the painting from looking flat.

In the picture below I added more detail to the dog. I got the whole dog wet, then, with thicker but moist paint, added some of his stripes on his body and markings on his face.

Below I added the pocket details. Working with a less wet paper, but still moist to keep things soft, I used a little bit thicker paint for the lines of the seams. To get the right moisture on the paper, I use a nice sable brush and squeeze out the water so it's not dripping, but still has plenty of water in it. I run this over the areas I want to add soft details.

Although the picture below was after the picture above, you'll notice the dog's muzzle is lighter. I use Mr. Clean Magic Eraser pads, the ones you find in the grocery store cleaning aisle, to 'erase' some of the paint. They don't have any harmful chemicals in them and are perfectly safe for painting.

Here I've added the first wash to the boot. I try to do the 'first wash' and maybe the 'first soft detail' step on each section before I progress to the final stage of the painting to put in the fine details, which I often do mostly on dry paper. Stay tuned for the final stages of this painting!
 To see some painting tutorials, click here. Click on uploads and you'll be able to scroll down to see the tutorials. I have over 20 posted.
Thursday, October 28, 2010
And another commission finished...

Trying to get through all these to clear my plate for Christmas commissions!
Subscribe to:
Posts (Atom)